BSTLearner - An interactive visualization of binary search trees
A binary search tree (BST) is a data structure used for storing, retrieving and sorting data in an efficient way
by using a binary tree structure with the property that the keys in a node’s left subtree are less and the keys in a node's
right subtree are greater than the key of the node itself, and then making it balanced.
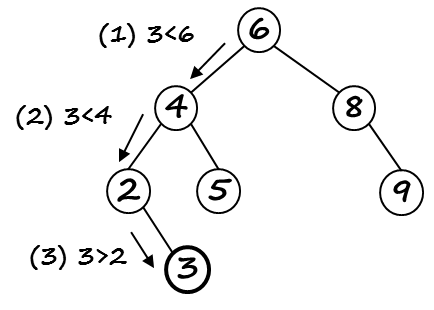
This tutorial explains the usage and implementation of an interactive binary search visualization in Python using Graphviz and Jupyter Notebook Widgets. Jupyter Notebook Version 1.0 BSTLearner 1.0.ipynb contains intermediate steps and test code. In Jupyter Notebook Version 1.2 BSTLearner 1.2.ipynb the classes have been moved to a Python module algolibs, so the notebook now is uncluttered and contains only the GUI / widgets code. This is work in progress! To be finished as project work by students.
Motivation
Binary search trees are best understood using interactive visualizations that show how to insert / search / delete values in a tree, how to create a tree from random numbers, how to balance the tree by performing left and right rotations, traverse the tree etc. Jupyter Notebook visualizations are useful because they can be easily shared with students and combine documentation and code blocks in a natural way. With Jupyter Notebook you can use the Python interface for the Graphviz graph-drawing software and create trees by using the Digraph class. With Jupyter Notebook Widgets you can add interactions and create a GUI in which the binary search tree operations can be explored step-by-step.
1 BSTLearner Usage
| Top |
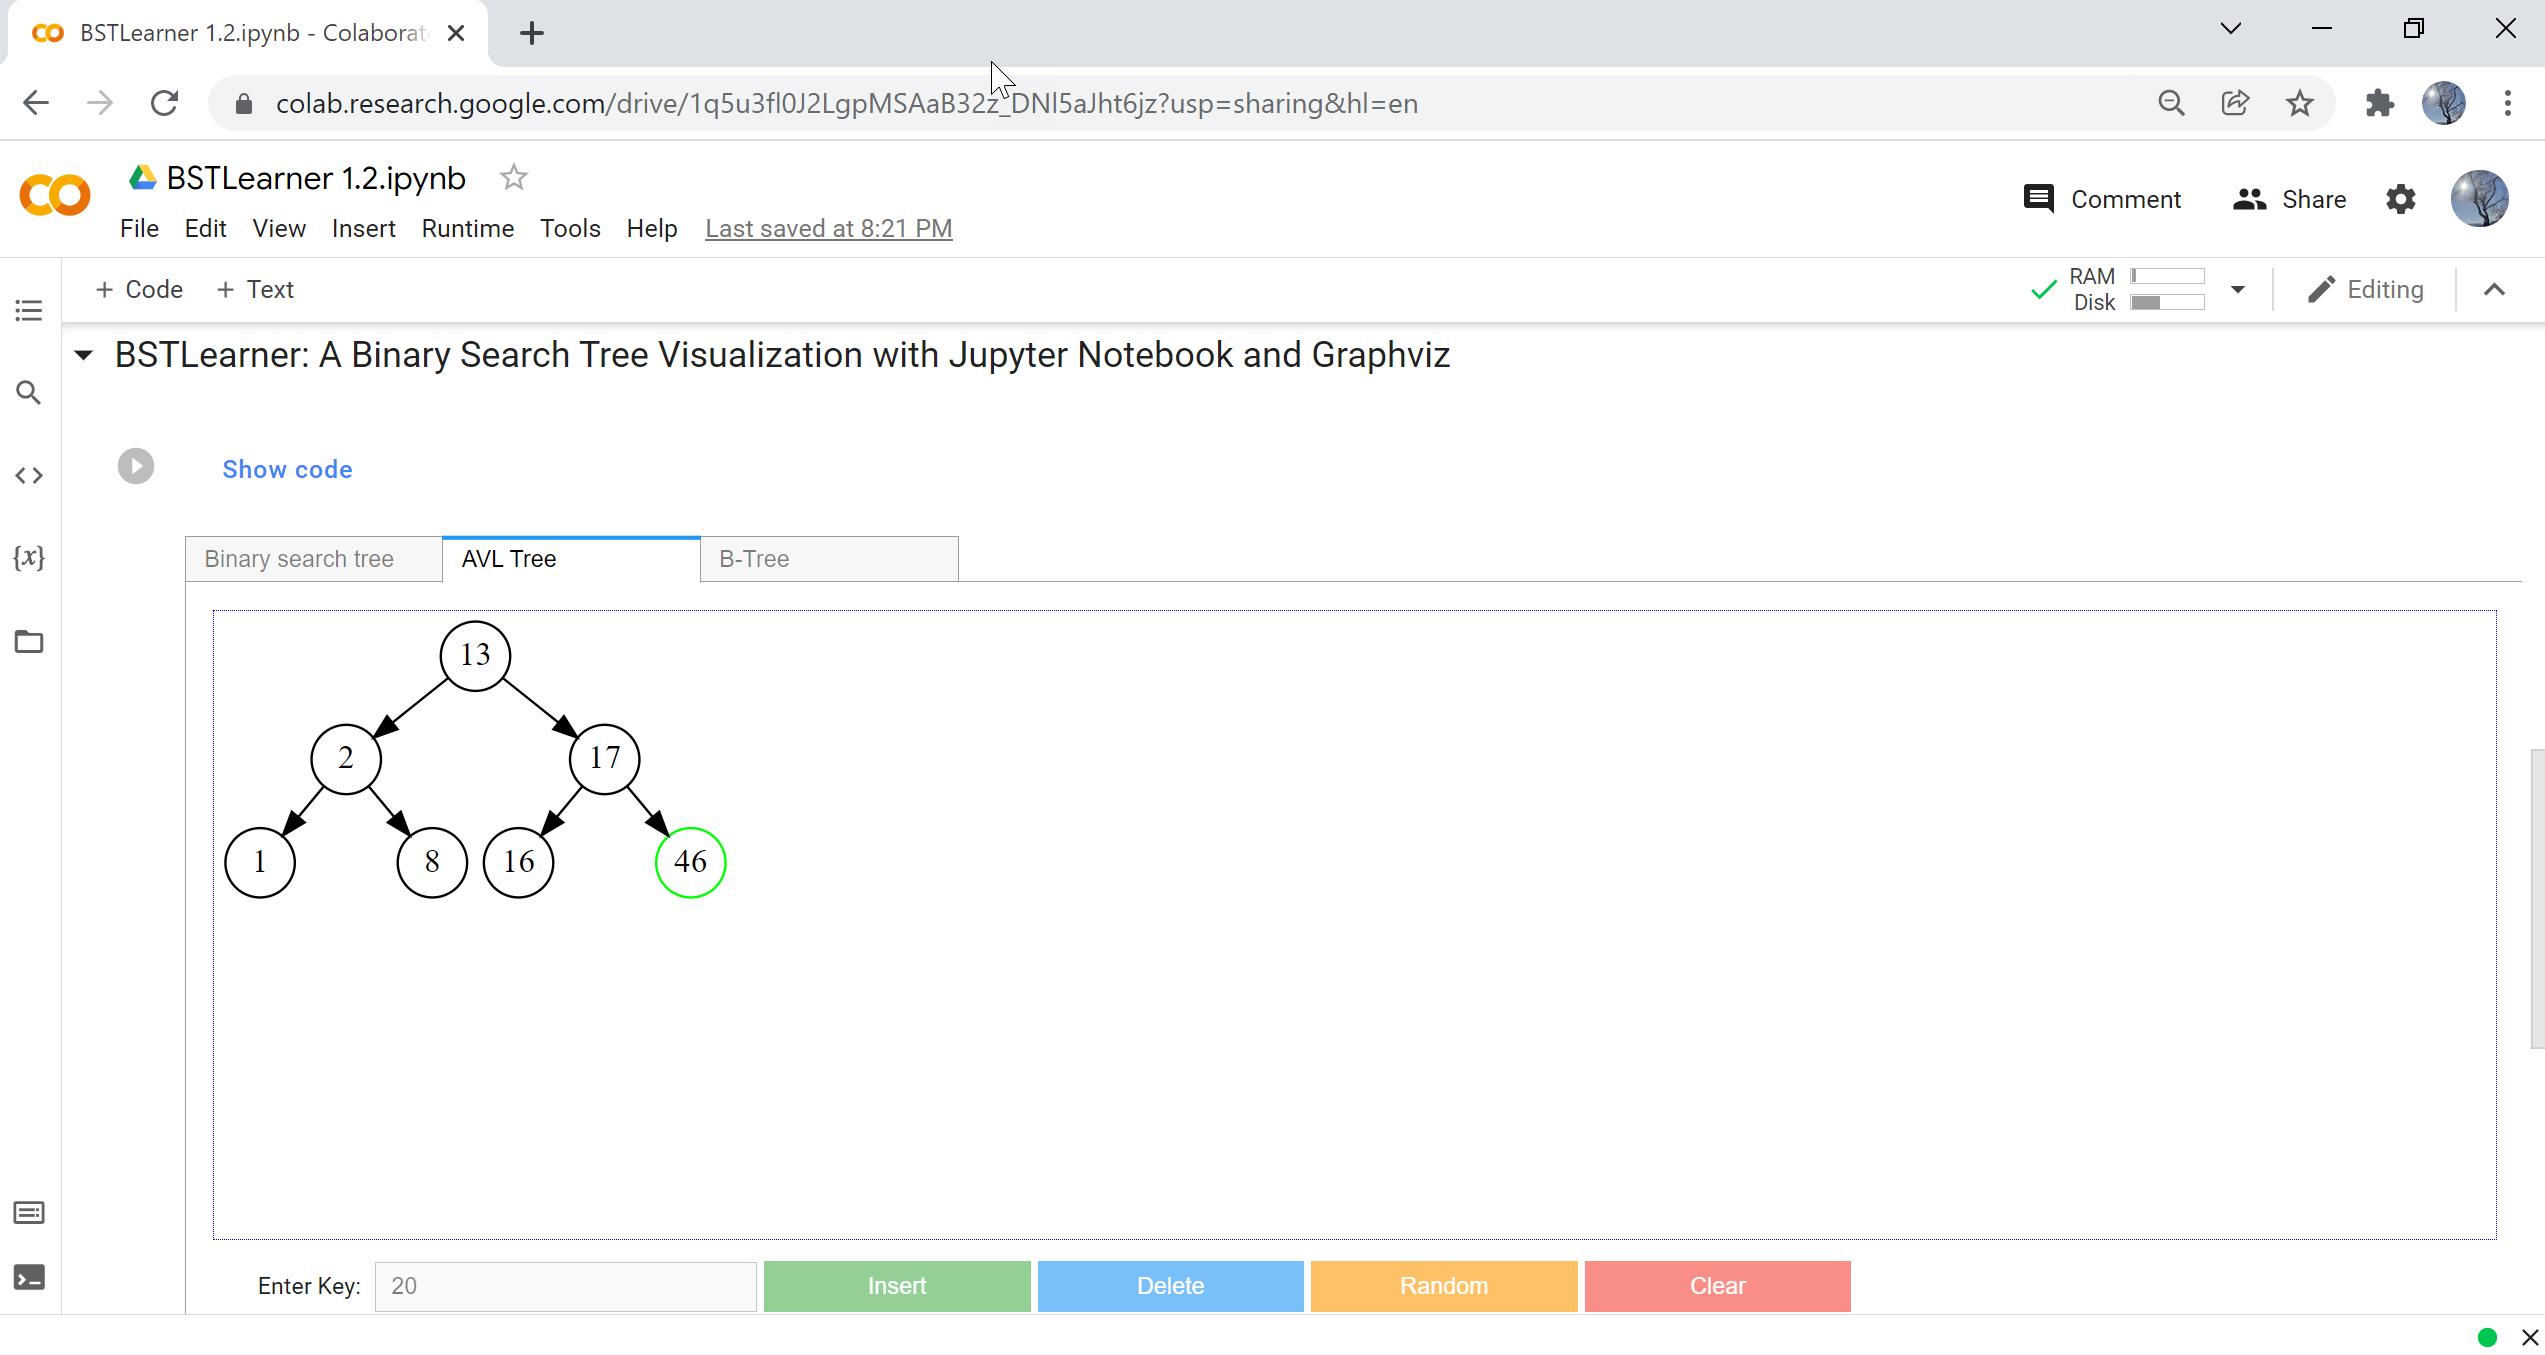
The BSTLearner app / Jupyter Notebook visualization has three tabs, the first one for binary search trees, the second one for AVL trees (self-balancing trees constructed by using a balancing factor and rotating the tree as needed to restore the balance), the third tab for B-Trees. You can create a new tree either step by step, by entering integer values in the Enter key field and then clicking "Insert", or by creating an entire tree from random numbers using the button Random. Single nodes are deleted using the Delete button, the entire tree is reset by using the Clear button.
- Insert: Enter integer number, then click Insert. If not already in the tree, the node is inserted.
- Search: Enter integer number, then click Search. If found, the node is colored green. Else a message is displayed.
- Delete: Enter integer number, then click Delete. If found, the node is deleted. Else a message is displayed.
- Random: Creates a tree from random numers in the range 1 .. 50.
- Clear: Deletes the data structure and clear the output.
BSTLearner: usage
How to run the Notebook
The GUI is shown in an output cell at the end of the Jupyter Notebook. In order to run it in Google Colab, save a copy of the existing Notebook BSTLearne1.0.ipynb in your own Google Colab and run it there.
BSTLearner usage: Video
How to create, modify and search trees
2 BSTLearner Implementation
| Top |
The BSTLearner 1.2 implementation consists of five classes stored in two Python files in the folder algolibs, bst.py and avl.py, as depicted in the UML diagram, plus a Jupyter Notebook that will contain the visualization with Jupyter Notebook widgets. Since the classes from the folder algolibs will be imported in other Python files and Jupyter Notebooks, we add an additional empty file __init__.py, which basically declares the folder to be a module.
In the first version BSTLearner 1.0 all classes were defined and tested within the Jupyter Notebook. This makes for a self-contained Notebook, but the increasing complexity of the code requires to move some of the classes in an user-defined Python module "algolibs" and finish the implementation in an integrated development environment such as Spyder or VSCode. This was done for BSTLearner 1.2. For deploying and using a self-defined Python module / package in Google Colab, the following steps must be obeserved:
- 1. Create a folder algolibs in your Google Drive and upload the files bst.py, avl.py and __init__.py there.
- 2. In the Jupyter Notebook BSTLearner1.2.ipynb, mount the Google Drive and add your Drive to the system path
by inserting a cell with the following code lines:
from google.colab import drivedrive.mount('/content/drive')import syssys.path.append('/content/drive/MyDrive') - 3. Import the required classes as follows:
from algolibs.bst import BST, BSTVizfrom algolibs.avl import AVLTree, AVLViz
Now you are ready to use the classes from the module algolibs!
BSTLearner implementation
Class descriptions
- TreeNode: The nodes of a binary search tree are created using the class TreeNode. This class has attributes for handling the data structure (pointer to parent node, left and right child) and also some attributes required for the visualization.
- BST: The class BST contains the methods for creating, modifying and traversing binary search trees. This class has an attribute root that stores the root of the binary search tree. When inserting a new node, the pointers to left or right child and parent node are set accordingly. The attribute list of the class stores list representations of the tree that are obtained from the tree traversals.
- BSTViz: The Graphviz visualization of a binary search tree bst is created using the method visualize() from the class BSTViz.
- AVLTree: The class AVLTree is a subclass of BST and inherits its attributes and methods. The methods implementing the tree operations (insert, search, delete) are overriden by methods with the same name that use the super-class methods and add the required code for balancing a tree.
- AVLViz: The Graphviz visualization of an AVL tree avl is created using the method visualize() from the class AVLViz.
UML Diagram
Package algolibs
The class usage is tested in the Python file BSTLearnerTest.py. For example, the required code for inserting the keys 1, 2, 3, 4, 5 in an AVL tree and visualize the tree, is:
from algolibs.avl import AVLTree, AVLVizavl = AVLTree()print("Insert 1, 2, 3, 4, 5")avl.insert_keys([1, 2, 3, 4, 5])AVLViz(avl).visualize()
Before you start, the following tools must be installed on your computer: Python, Anaconda (with Jupyter Notebook), Graphviz. Graphviz is open source graph visualization software, that describes graphs in a simple text language ("DOT"), and creates graph and tree visualizations in a number of image formats and as PDF.
2-1 Required packages
For creating an interactive GUI in Jupyter Notebook we need the classes and methods of the ipywidgets-package, as well as graphviz and pydot for the tree visualization. The packages can be installed as usually using pip or conda commands, for example pip install graphviz or conda install graphviz.
import numpy as npfrom numpy.random import seed, randintimport ipywidgets as widgetsfrom ipywidgets import interact, interactive_output, HBox, VBox, Layoutfrom IPython.display import display, clear_output, SVG, HTMLimport graphviz as gv # for visualizing a tree using Digraphfrom graphviz import Digraphimport pydot
2-2 Class TreeNode
| Top |
First, the implementation requires a class TreeNode that implements a node of the tree and has four attributes:
- key: the key for the node, which in our case is an integer number
- parent: a pointer to the parent of a node
- left: a pointer to the left child of a node
- right: a pointer to the right child of a node
Additional class attributes (pos, col and h) will be used for the Graphviz visualization with the Neato engine.
A binary search tree is created by linking nodes through the left and right pointers either to a left or to a right child. A node carries data, these are stored in the key attribute. The parent pointer is useful when deleting nodes. The method __init__ initializes the class on construction, the methods to_string and print are used for testing.
TreeNode Class
bst.py
class TreeNode:def __init__(self, key):self.key = keyself.parent = Noneself.left = Noneself.right = Noneself.pos = [0, 0] # Positionself.col = "black" # Colorself.h = 0 # Heightdef spos(self):''' Position of a node for neato '''return str(self.pos[0]) + "," + str(self.pos[1]) + "!"def to_string(self):return str(self.key)def print(self):print("TreeNode: %d" % (self.key))
TreeNode Test
BSTLearnerTest.py
In this test we create 3 nodes n10, n5 and n14 for the keys 10, 5 and 14 and set n10 to be the root, n5 its left child and n14 its right child.
from algolibs.bst import TreeNoden10 = TreeNode(10)n5 = TreeNode(5)n14 = TreeNode(14)# Create tree by linking the tree nodesn5.parent = n10; n14.parent = n10n10.left = n5 # left childn10.right = n14 # right childprint([n10.to_string(), n10.left.to_string(), n10.right.to_string()])
2-3 Class BST
| Top |
The class BST implements the methods to create, modify and traverse a binary search tree as data structure. We maintain two member variables: the root of the tree and a list containing the list representation of its elements.
- insert(k) inserts a node with key k in the tree.
- search(x, k) searches for the node with key k in the subtree with root x.
- find(k) searches for the node with key k in the entire tree.
- delete(k) deletes the node with key k in the tree.
- transplant(self, u, v) replaces subtree u with subtree v and is needed as helper method when deleting nodes.
The implementation of the methods uses the pseudocode from Cormens "Introduction to Algorithms" [1]. Some of the methods are implemented recursively, for example, the search for a key or the tree traversals.
BST (Class Definition)
bst.py
class BST():def __init__(self):self.root = None # Root of the treeself.list = []def insert(self, k):''' Insert a key '''def insert_keys(self, keys):''' Insert a set of keys'''for k in keys:self.insert(k)def search(self, x, k):''' Search for key k in subtree x '''def find(self, k):return self.search(self.root, k)def transplant(self, u, v):''' Replace subtree u with subtree v '''def delete(self, k):'''Delete node with key k from tree '''def height(self, x):''' Height of the subtree with root x '''
BST (Usage test)
BSTLearnerTest.py
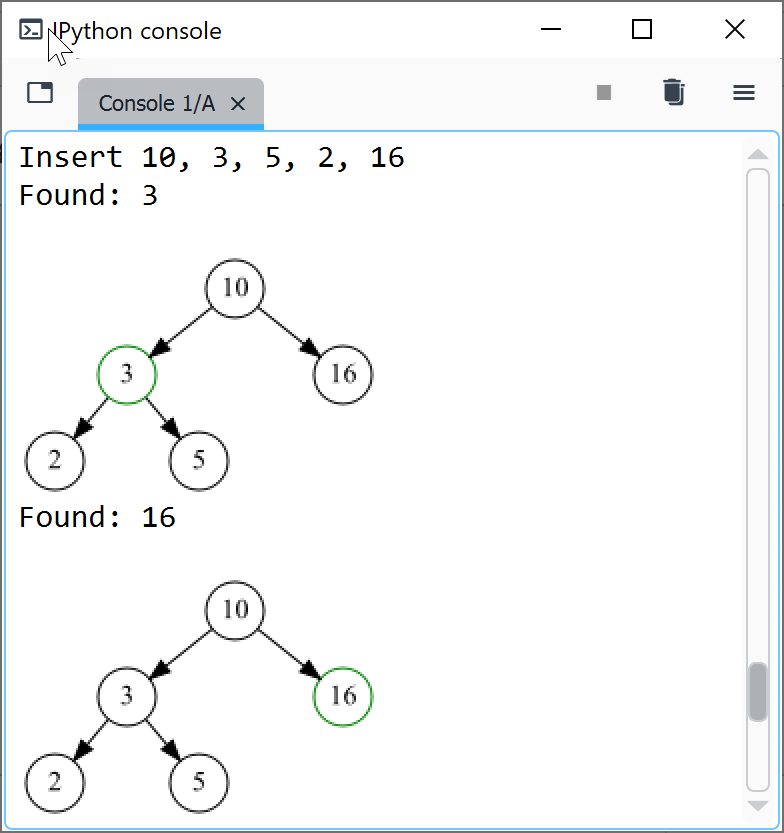
from algolibs.bst import BST, BSTVizbst = BST()print("Insert 10, 3, 5, 2, 16")bst.insert_keys([10, 3, 5, 2, 16])n3 = bst.find(3)print("Found: " + n3.to_string())BSTViz(bst).visualize()n16 = bst.find(16)print("Found: " + n16.to_string())BSTViz(bst).visualize()
BST Insert (Test Output)
BST: Tree Search
As illustration, we show the implementation of the TREE-SEARCH pseudocode given in Cormen [1] in Python.
A recursive search for key k starting at a node x can be implemented using the following pseudocode:
If the starting node x is null, we have reached a leaf and are done.
If the search k equals the key of node x, we have found the node we searched for, and again, done.
If the search key k is less than the key of node x, we continue recursively in the left subtree of x,
else continue recursively in the right subtree of x.
TREE-SEARCH (Pseudocode)
Finding a key recursively
TREE-SEARCH(x, k)if x == NULL or k == x.keyreturn xif k < x.keyreturn TREE-SEARCH(x.left, k)elsereturn TREE-SEARCH(x.right, k)
Tree Search (Python)
bst.py
def search(self, x, k):'''Search for a key k starting at node x'''if (x == None or x.key == k):return xif (k < x.key):return self.search(x.left, k)else:return self.search(x.right, k)def find(self, k):return self.search(self.root, k)
BST: Tree Rotations
Tree rotations are local operations in a binary tree that are used to balance a tree.
For example, when inserting the keys 10, 30, 20 in a binary search tree, the resulting tree is unbalanced: the left subtree has height 0,
the right subtree height 2. This imbalance can be corrected by first performing a right rotation on node 30 and then a left rotation
on node 10.

Rotate_left (Function definition)
bst.py
def rotate_left(self, x):''' Rotate left on node x'''y = x.right # set y to be right child# turn y's left subtree to x's right subtreex.right = y.leftif y.left != None:y.left.parent = xy.parent = x.parent # link x's parent to yif x.parent == None: # Case 1: x is rootself.root = yelif x == x.parent.left: # Case 2: x is left childx.parent.left = yelse: # Case 3: x is right childx.parent.right = yy.left = xx.parent = y
Rotate_left (Test)
BSTLearnerTest.py
from algolibs.bst import BST, BSTVizbst = BST()print("Insert 10, 30, 20")bst.insert_keys([10, 30, 20])BSTViz(bst).visualize()print("Rotate right on 30")bst.rotate_right(bst.find(30))BSTViz(bst).visualize()print("Rotate left on 10")bst.rotate_left(bst.find(10))BSTViz(bst).visualize()
2-4 Class BSTViz: Visualization with Graphviz
The class BSTViz extends BST with a Graphviz visualisation. Its only method visualize() creates a visualization of the tree recursively, using the Digraph class from the graphviz package [3]. We use the neato engine of Graphviz so as to be able to position the nodes explicitely to the left and right of their respective parent node. The position of a node has been defined as an attribute of the TreeNode class and is calculated from the position of its parent. In order to place a node to the left of its parent we subtract - h/4, where h is the height of the node. In order to place a node to the right of its parent, we add h/4, where h is the height of the node.
class BSTViz:def __init__(self, bst):self.bst = bstdef visualize(self):''' Visualize the tree using graphviz '''tree = self.bst.root # start with root of the treedot = Digraph()dot.engine = 'neato'# Place root node at position tree.posh = self.bst.height(tree)tree.pos = [0, h]dot.node(name=str(tree), label=str(tree.key), color = tree.col, shape="circle",fixedsize="True", width="0.4", pos=tree.spos())# Recursively place the other nodes and edgesdef add_nodes(tree, dot):if tree.left: # if left subtree: position node to left of parenttree.left.pos[0] = tree.pos[0] - h/4 # xtree.left.pos[1] = tree.pos[1] - 0.6 # ydot.node(name=str(tree.left), label=str(tree.left.key), color = tree.left.col,shape="circle", fixedsize="True", width="0.4", pos=tree.left.spos())dot.edge(str(tree), str(tree.left))dot = add_nodes(tree.left, dot=dot)if tree.right: # if right subtree: position node to right of parenttree.right.pos[0] = tree.pos[0] + h/4 # xtree.right.pos[1] = tree.pos[1] - 0.6 # ydot.node(name=str(tree.right), label=str(tree.right.key), color = tree.right.col,shape="circle", fixedsize="True", width="0.4", pos=tree.right.spos())dot.edge(str(tree), str(tree.right))dot = add_nodes(tree.right, dot=dot)return dotdisplay(add_nodes(tree, dot))
2-5 Class AVLTree
| Top |
Binary search trees are most useful when balanced, because only for a balanced tree the operations (search, insert, delete) have a time complexity of O(log n). The first type of self-balancing binary search trees is the AVL tree, named after its inventors Adelson-Velsky and Landis. An AVL tree uses a figure called balance = height (tree.right) - height (tree.left) to make sure that the heights of two child subtrees of any node differ by at most one. Insertion and deletions are first performed using the usual binary search tree methods. Then, the balance is calculated for each node, and if the balance is less than -1 or greater than 1, the tree is rebalanced using tree rotations.
Class AVLTree is defined as a subclass of class BST, thus inherits the variables and methods of the base class and extends them.
- insert(k) inserts a node with key k in the tree in a way that the balance of the tree is kept.
- search() searches a node in the tree. The search is the same as in a regular binary search tree, thus the method of the base class can be reused.
- delete(k) deletes the node with key k in the tree in a way that the balance of the tree is kept.
AVLTree (Class Definition)
avl.py
First a key is inserted as in a regular binary search tree. Then, the balance indicator b of the node is calculated as difference between the height of the right subtree and the height of the right subtree and according to the value of b the balance of the tree is restored by performing a left rotation, a right rotation, a right-left-rotation or a left-right rotation.
class AVLTree(BST):def __init__(self):super().__init__()def insert(self, k):''' Insert a key '''super().insert(k)p = super().find(k)prevBalance = 0while (p != None):b = super().height(p.right) - super().height(p.left)if (b > 1 and prevBalance > 0): # Case 1super().rotate_left(p)elif (b < 1 and prevBalance < 0): # Case 2super().rotate_right(p)elif (b > 1 and prevBalance < 0): # Case 3super().rotate_right(p.right)super().rotate_left(p)elif (b < -1 and prevBalance > 0): # Case 4super().rotate_left(p.left)super().rotate_right(p)prevBalance = bp = p.parent
AVLTree (Test)
BSTLearnerTest.py
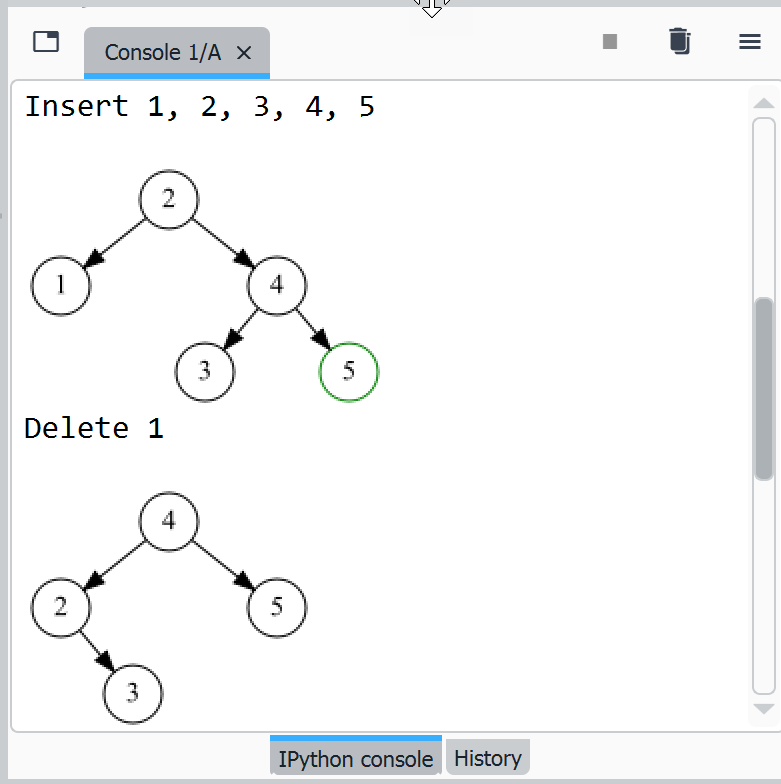
We create a new AVL tree by inserting a list of keys, visualize it, then delete key 1 and visualize it again. The tree has been balanced nicely.
avl = AVLTree()print("Insert 1, 2, 3, 4, 5")avl.insert_keys([1, 2, 3, 4, 5])AVLViz(avl).visualize()print("Delete 1")avl.delete(1)AVLViz(avl).visualize()
AVLTree (Test Output)
3 Testing the implementation
| Top |
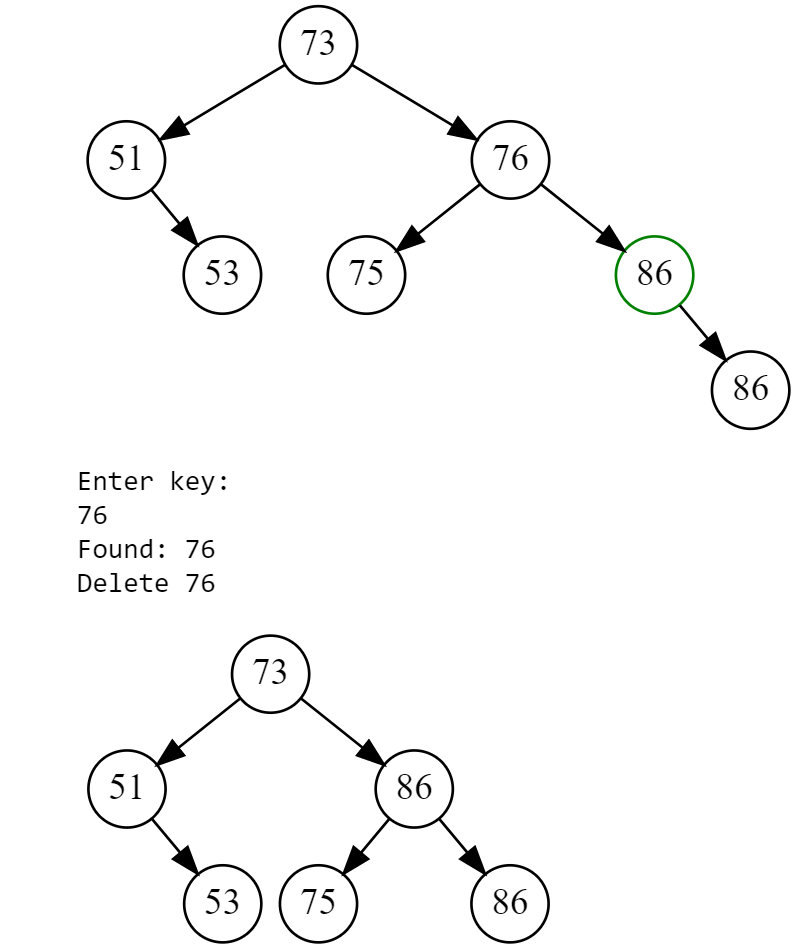
The implementation is followed by tests, in which we create different binary search trees and perform the implemented operations on it. We first test the AVLTree class without using the interactive visualization with widgets, by creating a new tree from random numbers, inserting /deleting random nodes and visualizing the tree after each step.
AVL Insert, find, delete
BSTLearnerTest.py
from numpy.random import randintfrom algolibs.avl import AVLTree, AVLVizavl = AVLTree()# Insert 7 random keyskeys = randint(1, 50, 10)avl.insert_keys(keys)# Visualize treeAVLViz(avl).visualize()print("Enter key:")x = int(input())# Find keynx = avl.find(x)if nx != None:print("Found: " + nx.to_string())avl.delete(x) # Delete keyAVLViz(avl).visualize()else:print("Not found: %d" % (x))
AVL Insert, find, delete (Test output)
4 Interactive GUI with Jupyter Widgets
| Top |
The final step is to create an interactive GUI with Jupyter Widgets. Each type of tree (BST, AVL, B-Trees) will be placed in its own tab. Each tab will have an edit box where the keys can be entered manually, a display area for the tree and buttons for the different operations (insert key, generate tree from random numbers, delete key, reset).
(1) Create container widgets
Firstly, create the tabs and output widgets that will contain the other controls: input fields, buttons and tree visualization.
You can display the empty GUI structure by using display(tab), just to check that everyting looks fine.
import ipywidgets as widgetsfrom ipywidgets import Tab, HBox, VBox, Outputfrom ipywidgets import BoundedIntText, Button, HTML# Create tabs and output objectsout, out1, out2, out3 = Output(), Output(), Output(), Output()tab = Tab(children = [out1, out2, out3],layout=Layout(width='100%', height='auto'))tab.set_title(0, 'Binary search tree')tab.set_title(1, 'AVL Tree')tab.set_title(2, 'B-Tree')with out1:htm = HTML("TODO: Insert your BST code here")display(htm)with out2:htm = HTML("TODO: Insert your AVL code here")display(htm)with out3:htm = HTML("TODO: Insert your B-Tree code here")display(htm)display(tab)
The graphical user interface created with these containers should look something similar as in the screenshot. In the space indicated by the placeholder "TODO" we will position the widgets for each type of tree, for the first tab, that will be a Text widget for entering keys, some buttons for performing actions as needed, and the output containing the Graphviz tree.

(2) Create buttons and event handler
For each button we create an eventhandler for the click-event that implements
the actions to be performed after clicking that button.
At this point, we need an input field where we can enter the keys to be inserted in the tree or deleted from the tree.
The input field ui_key is created using the BoundedIntText-widget.
We also need to create a new tree instance using the BST-class, this is our underlying data structure that we access and modify
through the insert / delete / find etc. methods.
The eventhandler on_button_insert_clicked first clears the output, then calls the insert-method from
the BST-class with the argument ui_key.value from the input field, then creates a graphviz dot file
using the visualize-method from the BST-class and finally display the tree.
# Create new treetree = BST()# Input field for keysui_key = BoundedIntText(value=20, min=0, max=100,step=2, description='Enter Key:')# Create buttonbtn_insert = Button(description='Insert', button_style='success')def on_button_insert_clicked(b):with out:clear_output()tree.insert(ui_key.value)BSTViz(tree).visualize()btn_insert.on_click(on_button_insert_clicked)
(3) Place widgets on first tab
Finally, we put everything together: the output out1 for the first tab will be a VBox containing four other widgets:
the HBox displ containing the tree visualization out, a HTML-widget msgbox for instructions and error messages
and finally a HBox-widget ctrl grouping the buttons.
# Layout for display and controlslayout_displ=Layout(height='350px', border='1px dotted blue', overflow ='auto')layout_ctrl=Layout(height='50px')with out1:msgbox = HTML(" ")displ = HBox([out], layout=layout_displ)ctrl = HBox([ui_key, btn_insert, btn_delete, btn_search], layout=layout_ctrl)display(VBox([displ, msgbox, ctrl]))with out2:msgbox = HTML(" ")displ = HBox([out], layout=layout_displ)ctrl = HBox([ui_key, btn_insert_avl, btn_delete_avl], layout=layout_ctrl)display(VBox([displ, msgbox, ctrl]))
After adding more buttons for the different tree operations, the first tab looks as displayed and the onclick-events for the buttons should work.

A minor inconvenience with a more elaborated Jupyter Widgets GUI is that it is shown at the end of the Jupyter Notebook, after rather lengthy class implementations and widgets definitions. To this, there are two solutions: 1. Create a package, put the helper classes there, and import them as you would do with other Python packages. 2. Hide the code cells (this can be done easily in Google Colab), so that only the output of the widget code cell is shown.
Tools & References
| Top |
For re-creating this visualization, the following tools must be installed on your computer: Python, Anaconda (with Jupyter Notebook), Graphviz. Graphviz is open source graph visualization software, that describes graphs in a simple text language ("DOT"), and creates graph and tree visualizations in a number of image formats and as PDF.
Or, you can skip the local installations and simply develop and run the Juypter Notebook as Google Colab script in the Cloud.
- [1] Cormen, Leiserson, Rivest, Stein: Introduction to Algorithms.
- [2] W3Schools: Classes in Python.
- [3] Graphviz Digraph.
- [4] Jupyter Notebook Widgets.
- [5] Jupyter Notebooks verwenden (in German).
- [6] Jupyter Notebook Widgets verwenden (in German).