Python Tutorial Part 2: Package Management
Part 2: Package Management of this compact Python tutorial describes how to install / manage Python packages using the package management systems pip and conda, and how to create environments for different projects. It further shows the usage of the dot-notation for importing installed packages entirely or partially (modules / functions) and how to develop own packages.
Motivation
The ease of use of free libraries for data science such as NumPy, Matplotlib, Pandas, Scikit-Learn, Keras and many others make Python an attractive choice for beginners and professionals.
Python libraries do have an extensive documentation and many available examples, as well as two powerful package management systems, pip and conda, that make it easy to create work environments for different tasks.
However, memory can be used up quickly by downloading multiple Python and package versions, and errors may arise when mixing them without properly using environments. For beginners then it is helpful to know which package management system to use in which case, how to use them together and how to eventually clean-up.
Overview
| Top |
1 What is a Python package?
Python packages are class and function libraries, i.e. groupings of classes and functions for defined areas of application. A package is simply a directory that contains an __init__.py file, which can be empty, and any number of Python modules that group related functions and classes. In Python, a module is any Python source file, e.g. main.py or decisiontree.py.
After a Python package has been created, the classes and functions defined in it can be used in other Python scripts by importing either the entire package or just individual modules or classes/functions.
Python packages are used in two ways: firstly, they use functions from existing packages to perform certain tasks. On the other hand, you develop your own functions and modules for subtasks and use them to structure larger programs.
Python has a built-in library - the Python Standard Library, which is available immediately after installation, and includes many basic functions such as mathematical functions, system functions, file access, encryption and other frequently needed tasks. There are also a number of specialized Python libraries that provide functionality for data analysis, machine learning, cryptography, and other applications.
A current list of Python libraries and software is maintained in the Python Package Index (PyPI).
| Top |
2 Install Python libraries
Python libraries that are not already included after installation must be installed using the package management tools pip or conda. Both are command-line tools operated via the Python console. While pip is mainly for Python package management, conda supports other languages such as the statistical programming language R and also supports environments. The syntax of the commands is similar, e.g. pip list (install, update, uninstall...) or conda list (install, update, remove ...).
| Top |
2-1 Package manager pip
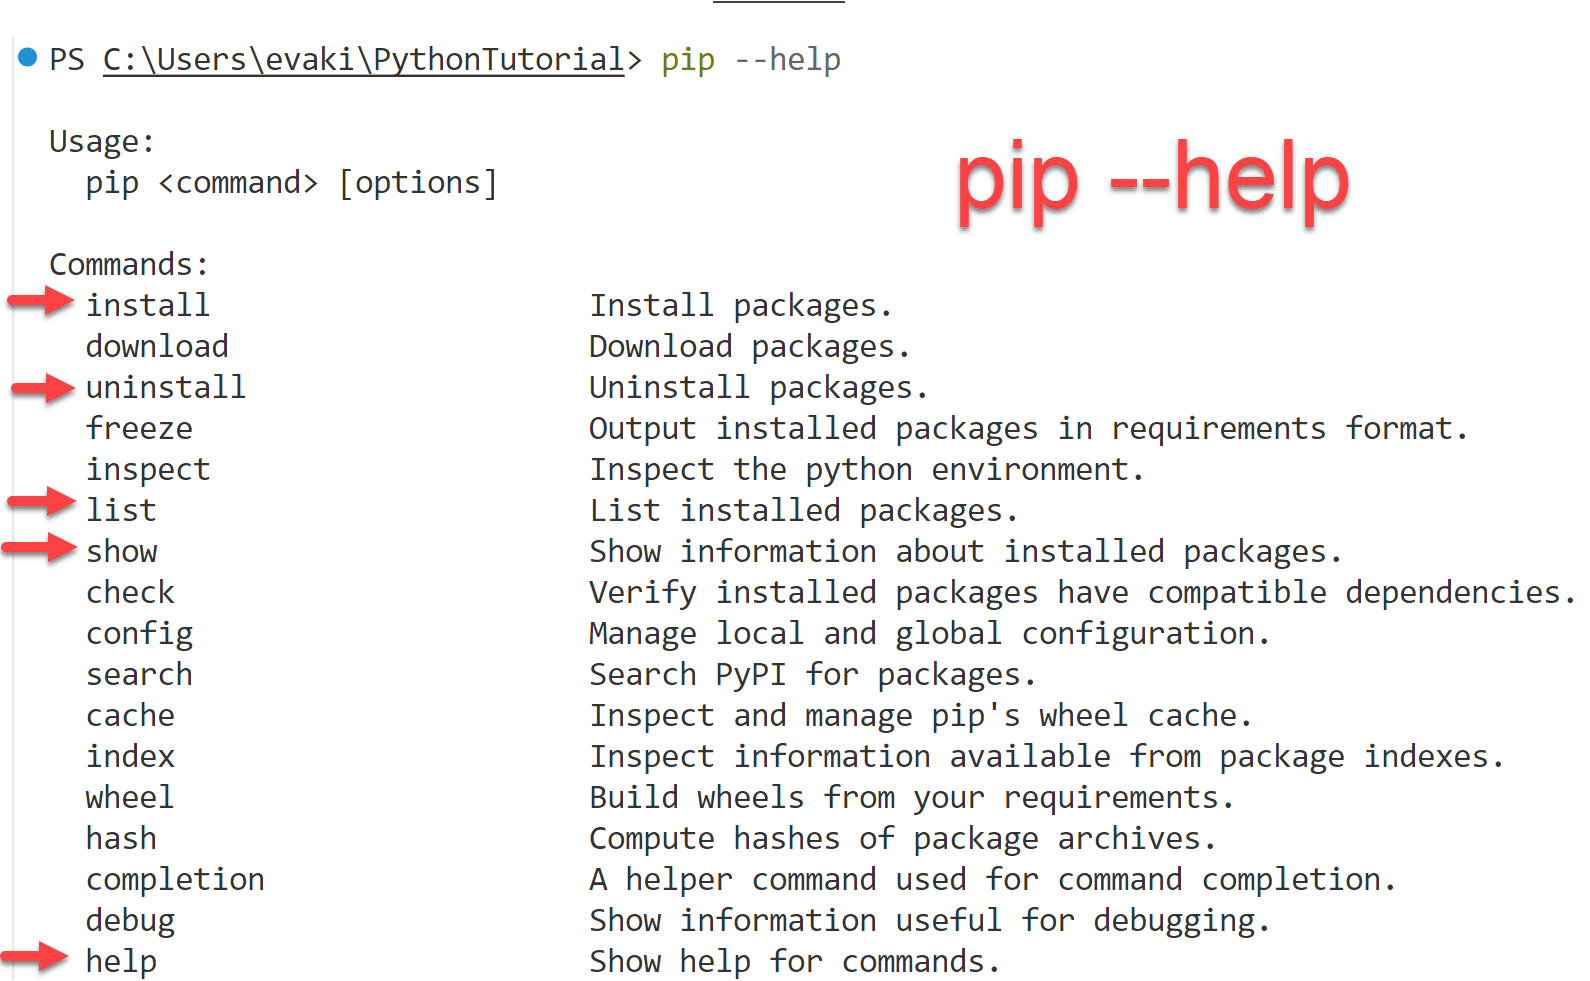
Pip is Python's default package management system and by default installs its packages from the Python Package Index (PyPI), however other sources can be specified, such as Github or files. The general syntax of a pip command is pip command [options] package. The command is one of: list, show, install, uninstall [...], for example pip install gym. The options can specified in a long form, such as in pip --help, or in a short form, such as in pip -h.
Manage packages using pip
This example shows how to use pip to list packages, show information for a specific package, install / update / uninstall a package.
pip --helppip listpip show numpy, pandaspip install pandaspip install numpy --updatepip uninstall numpy
Larger Python projects may require the installation of multiple Python packages in matching versions. To simplify this process, the required dependencies for a project are written into a requirements.txt file, which is passed to the pip install command using the -r option. The option -r installs all packages listed in an requirements.txt file.
Example: Install libraries using requirements.txt
In this example, all libraries required by an Reinforcement Learning project are specified
with exact version in the file requirements.txt and installed in a dedicated Conda environment using pip.
Step 1: Create requirements.txt
This file should be placed in your project folder.
# requirements.txt
tensorflow==2.12.0
keras-rl2==1.0.5
gym==0.25.2
Step 2: Install using requirements.txt
The next commands are execute in the terminal.
It is important that you first change the directory to the path where the requirements.txt sits.
Then, create a new conda environment, activate it, and install the libraries using pip.
All the specified packages and dependencies will be installed in this environment.
cd C:\users\yourname\rl
conda create --name env-rl
conda activate env-rl
pip install -r requirements.txt
| Top |
2-2 Package manager conda
Conda is a package management system that can be used for installing and updating packages and also for managing application environments. Conda is installed as part of the Anaconda platform (around 3GB with many pre-installed features). or the lighter distribution Miniconda (500MB). The advantage of using Anaconda is to have a graphical user interface for creating and managing packages and environments, so in this way it is helpful for beginners.
The general syntax of a conda command is conda command [options] package / environment. To create an environment myenv, you write conda create myenv. To activate an environment myenv, you write conda activate myenv.
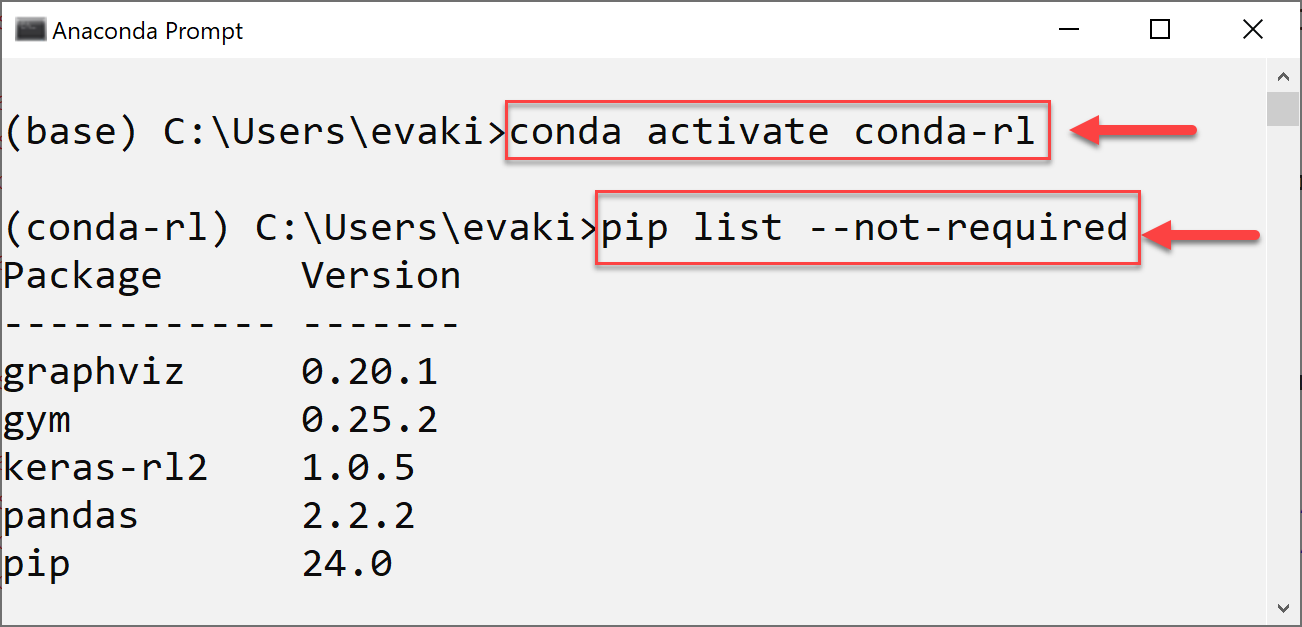
Example: Manage packages using conda
This example shows how to use conda to list packages and install / update / uninstall a package. We first create and activate an environment conda-ml, then list the installed packages, then install the package pandas in the currently activated environment and in another already existing environment that is specified explicitly. We do not specify any version numbers for the packages, so the last version is installed.
conda create conda-dlconda activate conda-dlconda listconda install pandas # install into current environment conda-dlconda install --name myenv pandas # install into specified environmentconda update pandasconda remove pandas
Example: Manage environments using conda
Conda environments are directories that store specific versions of Python + libraries + dependencies as needed by different projects. Environments can be activated and deactivated, so that you can have setups for different projects in parallel and switch between them. In this example we create an environment called conda-dl, activate it, install a special set of program packages into it, then deactivate it. Note that packages can be installed using pip or conda, the difference is (1) from which repository they are downloaded and (2) in which local folder they are stored.
conda create --name conda-dlconda activate conda-dlpip install keras==3.5.0pip install tensorflow==2.16.2conda deactivate conda-dlpip install pandaspip show keraspip show tensorflow
| Top |
3 Import Python libraries
Python libraries and functions are imported using the import command, followed by the name of the library to be imported, for example import numpy. After importing a library, all of its classes and functions can be used by prepending the name of the library to the class or function name, as in numpy.array or numpy.linspace
import numpyx = numpy.array([0, 0.25, 0.5, 0.75, 1])print(x)x = numpy.linspace(0, 1, 5) # [0. 0.25 0.5 0.75 1. ]print(x)
| Top |
3-1 Import package using alias name
A best practice for imports is to use an abbreviated alias name via as-keyword, e.g. np for numpy, or plt for matplotlib. In the following example, the packages NumPy and Matplotlib are each imported with an alias name, which must then be prepended to the function calls, e.g. np.linspace(), or plt.plot().
import numpy as npimport matplotlib.pyplot as pltx = np.linspace(0,10,40) # x-valuesy = np.sin(x); # y-valuesplt.plot(x, y,'r*', label='sin');
| Top |
3-2 Import selected functions from package
With the import statement you import entire packages, e.g. import numpy
or selectively classes / functions / constants from packages, e.g. from numpy import linspace, sin.
In this example we import only the needed functions: linspace, sin and plot.
from numpy import linspace, sinfrom matplotlib.pyplot import plotx = linspace(0, 10, 40)y = sin(x)plot(x, y,'r*', label='sin');
| Top |
3-3 Best practices
The best practice for importing packages is to keep it as explicit and unambiguous as possible. Usually, this means to import the entire package using a short alias name, such as np for numpy and plt for matplotlib, and prepending this alias to every class and function call. This ensures that the code is transparent, making it clear which function belongs to which package, although the function calls get a bit longer.
When working with specific classes in a deeper hierarchy, it may be more convenient to import that single class. For example, assume you use the subclasses and methods of the class tree from the Scikit-Learn library. Then you would import the class tree, and subsequently access its subclasses and methods by prepending "tree" to all the calls.
from sklearn import treemodel = tree.DecisionTreeClassifier(criterion='entropy', splitter='best')model.fit(X_train, y_train)tree.plot_tree(model)
4 Create own Python packages
To create own Python packages, it is required to place all related Python source files in a separate directory, and this directory must also contain a file called __init.py__. The contents of __init.py__ can be empty; this file only has the task of identifying the directory as a package.
4-1 Create package
As an example, let's create a package called mypkg that contains two modules, module1.py and module2.py. Module module1.py contains the definition of two functions myfunc1 and myfunc2. Module module2.py contains the definition of a class "Car" with one method that displays the class attributes vendor and make, code is given below.
mypkg/module1.py
Python script module1.py is simply a collection of related functions.
# Collection of functionsdef my_func1(text):print(text)def my_func2(x):return x*2
mypkg/module2.py
Python script module1.py contains a class definition.
# Collection of classesclass Car:def __init__(self, vendor, make):self.vendor = vendorself.make = makedef display(self):print("Vendor: " + self.vendor + ", Make: " + self.make)
4-2 Use package
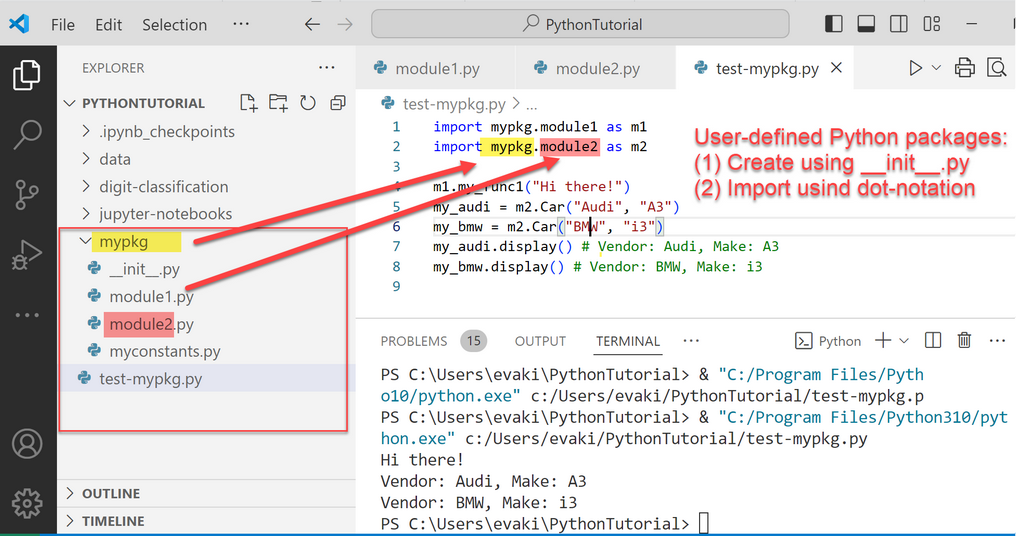
To use the previously created package, we create a test script pkg_test.py located in the parent folder of the mypkg directory. Modules module1 and module2 are imported with aliases m1 and m2. To import module1 from package mypkg with name alias m1, the command import mypkg.module1 as m1 is used. Then, any call to a function from module1 must be specified in the form m1.myfunc1().
pkg_test.pyimport mypkg.module1 as m1import mypkg.module2 as m2m1.my_func1("Hi there!")my_audi = m2.Car("Audi", "A3")my_bmw = m2.Car("BMW", "i3")my_audi.display() # Vendor: Audi, Make: A3my_bmw.display() # Vendor: BMW, Make: i3
A screenshot of the project in VS Code summarizes the steps for creating your own Python package: First create the directory structure and add an __init__.py file, as in the explorer panel (left). Then create the scripts in which you want to use the package outside of the package, for example in the parent folder. Finally, import the package by using correct names for package and modules (see color-coded highlights).
If you plan to publish your own Python project in PyPI, the packaging process is more elaborated and requires to add a metadata file pyproject.toml, as described in the PyPI guide.
References and tools
- [1] Python Documentation at python.org: docs.python.org/3/tutorial/
- [2] Anaconda: anaconda.com/ package management system, also needed for installing Jupyter Notebook
- [3] Miniconda: miniconda-install/ package management system, lightweight version of Anaconda
- [4] PIP Package Manager: pypi.org/project/pip/
- [5] Conda Cheatsheet: conda-cheatsheet.pdf
- [6] Python Package Index: pypi.org/